
123ignition Distributor Installation
The instruction booklet can be a little vague so I made this page to show you step-by-step how to do the conversion.
Ignition Basics
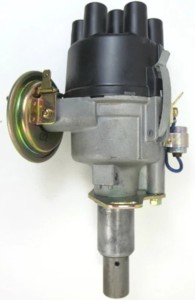 When the 240z was designed, ignition systems used points inside the distibutor. To see how points work, take a look here .
Points-type ignitions were first used in 1910 and were the standard for decades. They're reliable and pretty rugged but points need to be replaced about every 10,000 miles and the gap needs to be set using a feeler gauge or a dwell meter. Electronic versions started to appear about 1970. At first they were pretty crude and some were prone to breakdowns, but they got better over the years and by the mid-80s they were used on every car. Now you can have one for yours.
With that said, my 123ignition distributor died after about 50 miles. I bought it from an eBay seller quite a few months before doing the installation so there's no chance of getting a refund. I could get it repaired, but it's not cheap. For now I'm going back to a stock distributor.
When the 240z was designed, ignition systems used points inside the distibutor. To see how points work, take a look here .
Points-type ignitions were first used in 1910 and were the standard for decades. They're reliable and pretty rugged but points need to be replaced about every 10,000 miles and the gap needs to be set using a feeler gauge or a dwell meter. Electronic versions started to appear about 1970. At first they were pretty crude and some were prone to breakdowns, but they got better over the years and by the mid-80s they were used on every car. Now you can have one for yours.
With that said, my 123ignition distributor died after about 50 miles. I bought it from an eBay seller quite a few months before doing the installation so there's no chance of getting a refund. I could get it repaired, but it's not cheap. For now I'm going back to a stock distributor.
Pertronix Ignition
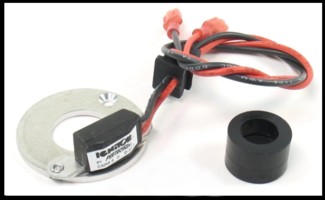 A simple and relatively cheap upgrade is to replace the points with an electronic adapter from Pertronix. It goes inside your stock distributor, which is important if you want your engine to look totally stock. It's pretty easy to install and also reasonably priced. You still have to set the ignition timing manually. You also have to keep your mechanical or vacuum advance. There are different opinions regarding which of those works better but I'm not going to get into that here.
However, if you look online you can see the Pertronix adapter is not always reliable. I've also known a few guys who race and all of them stick with the points-type distributor.
A simple and relatively cheap upgrade is to replace the points with an electronic adapter from Pertronix. It goes inside your stock distributor, which is important if you want your engine to look totally stock. It's pretty easy to install and also reasonably priced. You still have to set the ignition timing manually. You also have to keep your mechanical or vacuum advance. There are different opinions regarding which of those works better but I'm not going to get into that here.
However, if you look online you can see the Pertronix adapter is not always reliable. I've also known a few guys who race and all of them stick with the points-type distributor.
123ignition Electronic Distributor
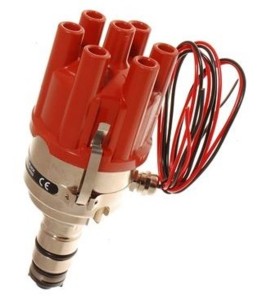 Here's the 123ignition distributor, which eliminates everything. In 2023, the cost was about $600, which is a bit of a bite.
It uses an app on your phone via bluetooth to give you an amazing array of options, such as what the idle timing is, when the timing advances, how far it advances, and so on. You can set a rev-limit. It can also function as an "imobilizer" to prevent your car being hotwired and stolen.
They make them for a variety of vintage cars. This one is for a 240z, but it's not a simple "plug & play" installation.
Here's the 123ignition distributor, which eliminates everything. In 2023, the cost was about $600, which is a bit of a bite.
It uses an app on your phone via bluetooth to give you an amazing array of options, such as what the idle timing is, when the timing advances, how far it advances, and so on. You can set a rev-limit. It can also function as an "imobilizer" to prevent your car being hotwired and stolen.
They make them for a variety of vintage cars. This one is for a 240z, but it's not a simple "plug & play" installation.
Comparing New Vs. Old
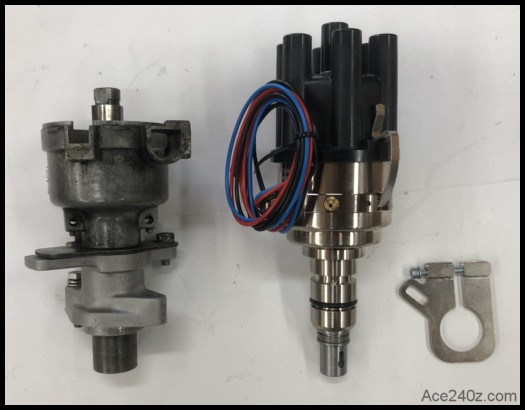 Here's my old distibutor next to the 123 version. The new one looks taller but only because the original one doesn't have the cap. It's also quite a bit brighter, which I'll probably mute in the future.
Their instruction book doesn't mention that the base of the stock distributor needs to be removed and reused. Fortunately it's only held on with two little bolts.
Here's my old distibutor next to the 123 version. The new one looks taller but only because the original one doesn't have the cap. It's also quite a bit brighter, which I'll probably mute in the future.
Their instruction book doesn't mention that the base of the stock distributor needs to be removed and reused. Fortunately it's only held on with two little bolts.
The Base
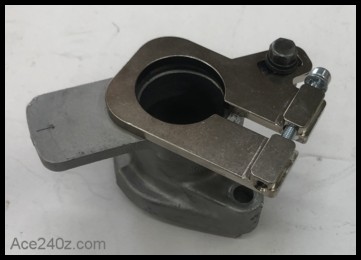 Here's the base. Now's a great time to give it a really good scrub with some steel wool and soap.
The clamp that came with the kit attaches to the threaded hole in the small tab.
Eventually I'll cut off the big tab on the left. It's no longer needed and the base will look cleaner.
Here's the base. Now's a great time to give it a really good scrub with some steel wool and soap.
The clamp that came with the kit attaches to the threaded hole in the small tab.
Eventually I'll cut off the big tab on the left. It's no longer needed and the base will look cleaner.
Base Installed
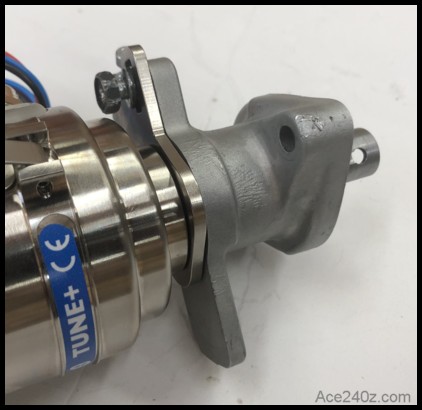 There's a rubber o-ring on the new shaft to keep oil from creeping upward. I carefully removed it, then slid the new clamp up the shaft. Make sure you have it turned the right way to attach to the base.
I put the o-ring back on and gave it a little squirt of oil prior to installing the base
Next came the base. It takes a little pressure to slide it over the o-ring. Be cautious to prevent the o-ring from getting damaged.
That ugly, gnarled bolt was replaced with a new allen-head cap screw. It was worth the $1.29.
The blue label has got to go.
There's a rubber o-ring on the new shaft to keep oil from creeping upward. I carefully removed it, then slid the new clamp up the shaft. Make sure you have it turned the right way to attach to the base.
I put the o-ring back on and gave it a little squirt of oil prior to installing the base
Next came the base. It takes a little pressure to slide it over the o-ring. Be cautious to prevent the o-ring from getting damaged.
That ugly, gnarled bolt was replaced with a new allen-head cap screw. It was worth the $1.29.
The blue label has got to go.
Engine Prep
 Now that the distributor and base are assembled, it's time to get the engine ready.
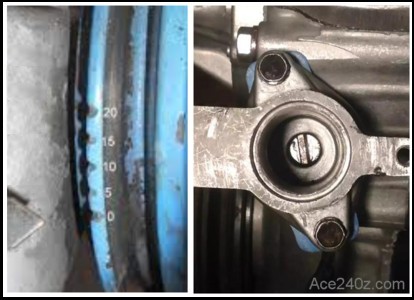
It needs to be at TDC (top dead center) for cylinder #1. There are a couple of different ways to do that, but the easiest is pull out the spark plugs and rotate the engine with a wrench until the TDC timing mark on the crankshaft pulley is lined up with the pointer. When you have TDC dialed in, you can put the plugs back in.
On the left side of this photo you can see the timing marks. The pointer is aimed at zero, which is TDC. On the right side you're looking down the hole where the distributor shaft goes. At the bottom of that hole you can see a little "tang" on the oil pump shaft. It needs to be at the angle shown.
The reason you have to find TDC is because you need to swap the plug wires from the old distributor cap to the new one, and the wire for cylinder #1 will be in a different spot.
Now that the distributor and base are assembled, it's time to get the engine ready.
It needs to be at TDC (top dead center) for cylinder #1. There are a couple of different ways to do that, but the easiest is pull out the spark plugs and rotate the engine with a wrench until the TDC timing mark on the crankshaft pulley is lined up with the pointer. When you have TDC dialed in, you can put the plugs back in.
On the left side of this photo you can see the timing marks. The pointer is aimed at zero, which is TDC. On the right side you're looking down the hole where the distributor shaft goes. At the bottom of that hole you can see a little "tang" on the oil pump shaft. It needs to be at the angle shown.
The reason you have to find TDC is because you need to swap the plug wires from the old distributor cap to the new one, and the wire for cylinder #1 will be in a different spot.
Install The New Distributor
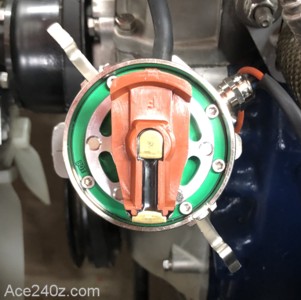 Now you can slide the distributor shaft down into the engine. Turn the shaft back and forth until the slot on the bottom connects with the tang on the oil pump shaft. You'll feel a little "click" as it drops into place.
This photo was taken after some testing, so the rotor isn't pointing in the right direction, but it shows you what the distributor looks like installed.
Bolt the base to the timing chain cover.
Refer to the installation booklet for how to set the distributor in the right position. It's pretty easy.
Now you can slide the distributor shaft down into the engine. Turn the shaft back and forth until the slot on the bottom connects with the tang on the oil pump shaft. You'll feel a little "click" as it drops into place.
This photo was taken after some testing, so the rotor isn't pointing in the right direction, but it shows you what the distributor looks like installed.
Bolt the base to the timing chain cover.
Refer to the installation booklet for how to set the distributor in the right position. It's pretty easy.
The Phone App
 If haven't downloaded the app, do it now. You'll need it from here on. The instruction booklet has the information for which app to use for whatever phone you have.
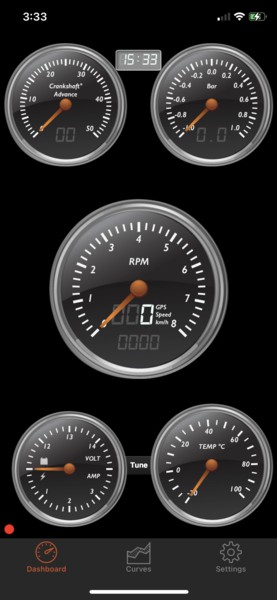
Here's what the dashboard looks like. When the engine is running you can see everything move on the dials. It's pretty impressive. At the bottom you can click on "Curves" which allows you to create multiple power curves to suit your needs (or whims).
Considering how much the distributor costs, I'm glad the damn app is free.
If haven't downloaded the app, do it now. You'll need it from here on. The instruction booklet has the information for which app to use for whatever phone you have.
Here's what the dashboard looks like. When the engine is running you can see everything move on the dials. It's pretty impressive. At the bottom you can click on "Curves" which allows you to create multiple power curves to suit your needs (or whims).
Considering how much the distributor costs, I'm glad the damn app is free.
Plug Wires
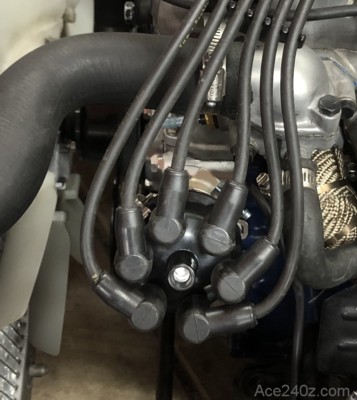 Take note of where the rotor is pointing, then snap the cap into place.
Starting with the hole directly over rotor, insert the plug wire for cylinder #1, then continue counter-clockwise one at a time. Having them pre-numbered makes it pretty easy.
Double-check they're firmly seated and the order is correct.
Take note of where the rotor is pointing, then snap the cap into place.
Starting with the hole directly over rotor, insert the plug wire for cylinder #1, then continue counter-clockwise one at a time. Having them pre-numbered makes it pretty easy.
Double-check they're firmly seated and the order is correct.
How To Connect The 123ignition Distributor
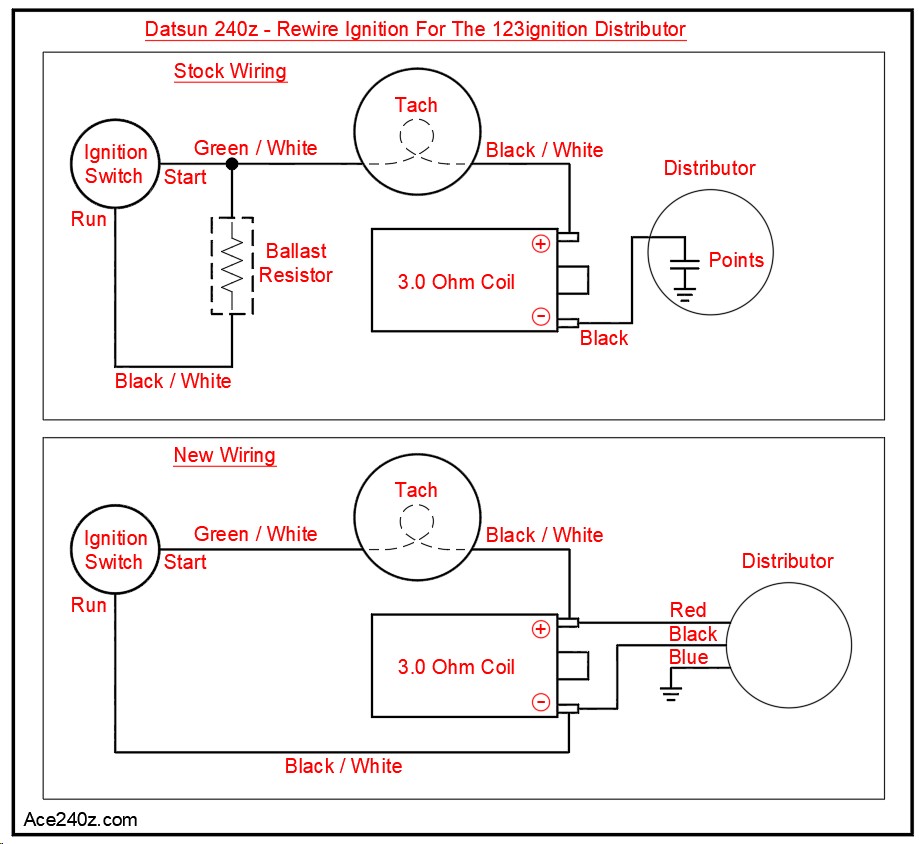 Here's how to rewire your ignition for the new distributor. Click on it for a larger version.
At the top is the stock ignition. At the bottom is the new one. It's easier than it looks.
The stock wiring has a ballast resistor between the coil and distributor. There are two green/white wires connected to one side of the ballast. Disconnect them and tie them together. You can use a crimp connector or solder them together.
There is a black/white wire connected to the other side of the ballast resistor. Disconnect it and reconnect it to the negative (-) side of the coil.
You don't need the ballast resistor any longer. Unscrew the ugly thing and throw it away.
To connect the new wiring, refer to the instruction booklet. Follow the directions carefully to make certain you don't ruin your expensive upgrade.
I ran the wires thru some heat-shrink tubing, then used zip-ties to keep it in place. Little things like that make a big difference. I hate having stuff dangling all over the place.
Here's how to rewire your ignition for the new distributor. Click on it for a larger version.
At the top is the stock ignition. At the bottom is the new one. It's easier than it looks.
The stock wiring has a ballast resistor between the coil and distributor. There are two green/white wires connected to one side of the ballast. Disconnect them and tie them together. You can use a crimp connector or solder them together.
There is a black/white wire connected to the other side of the ballast resistor. Disconnect it and reconnect it to the negative (-) side of the coil.
You don't need the ballast resistor any longer. Unscrew the ugly thing and throw it away.
To connect the new wiring, refer to the instruction booklet. Follow the directions carefully to make certain you don't ruin your expensive upgrade.
I ran the wires thru some heat-shrink tubing, then used zip-ties to keep it in place. Little things like that make a big difference. I hate having stuff dangling all over the place.
Start It Up
 With everything connected per the booklet, now it's time to see if it works.
Mine started right up but ran like crap. Sputtered, barely rev'd, backfired - it was horrible.
I poked around online and found a basic curve and set mine to match. It ran better, but not great. I did a little more fiddling without much success.
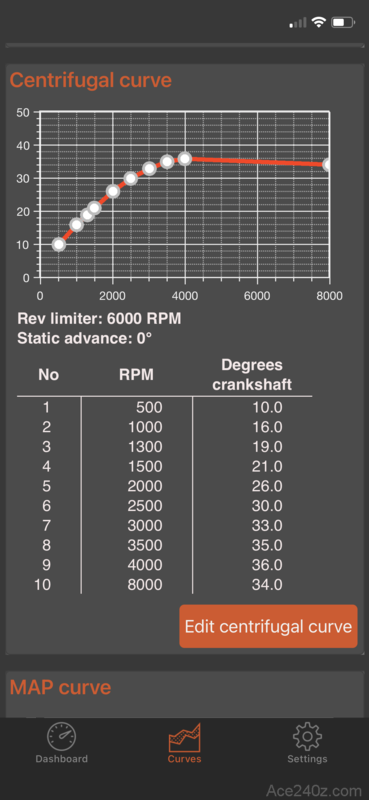
Then a helpful guy on one of the 240z pages on Facebook found a pretty decent curve that someone else had used on their car. I did some quick programming and suddenly the engine ran great. With a few more tweaks, it now runs and revs better than ever before.
The curve shown is what I'm currently using. I plan on taking the car to a dyno in the next week or two and should be able to dial it in perfectly.
To sum up, this wasn't the easiest project I've done but it's worth every minute and every penny. I'm really, really happy with how well it works.
I'll never have to mess with points again.
With everything connected per the booklet, now it's time to see if it works.
Mine started right up but ran like crap. Sputtered, barely rev'd, backfired - it was horrible.
I poked around online and found a basic curve and set mine to match. It ran better, but not great. I did a little more fiddling without much success.
Then a helpful guy on one of the 240z pages on Facebook found a pretty decent curve that someone else had used on their car. I did some quick programming and suddenly the engine ran great. With a few more tweaks, it now runs and revs better than ever before.
The curve shown is what I'm currently using. I plan on taking the car to a dyno in the next week or two and should be able to dial it in perfectly.
To sum up, this wasn't the easiest project I've done but it's worth every minute and every penny. I'm really, really happy with how well it works.
I'll never have to mess with points again.